If you are an enthusiast biker, you don’t want to run to a dealer or mechanic for things you can easily do on your own. One of those things is checking the engine oil in your bike and changing it.
And a common question Harley owners have is, “Do you check Harley engine oil on the kickstand?”
The answer is yes for most Harley models—Softtails and Sportsters are exceptions.
With this TL;DR version out of the way, let’s discuss Harley engines and how to change the engine oil in a Harley bike.
Here’s what we’ll cover:
Why Do You Check Harley Engine Oil on Kickstand and Not Upright Position?
According to the owner’s manual of Harley Davidson’s bikes, you should check the oil levels on the kickstand/jiffy stand for most models—Softails and Sportsters models are exceptions to this rule.
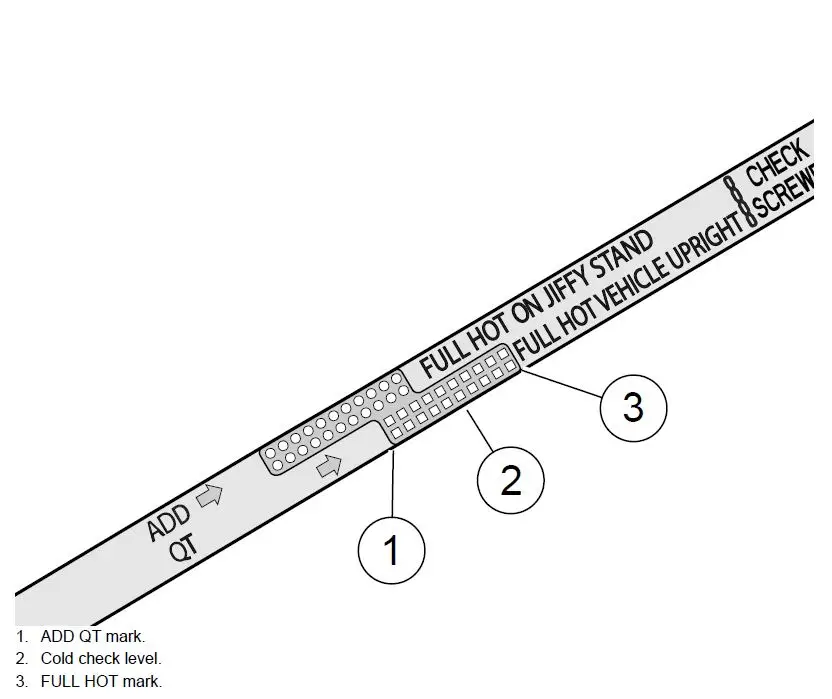
The reason why checking the oil of most Harleys is recommended on kickstands is due to Harley’s dipstick. A usual dipstick on Harley looks as shown in the figure. It has two separate marks on the dipstick for Jiffy stand as well as for the vehicle’s upright position.
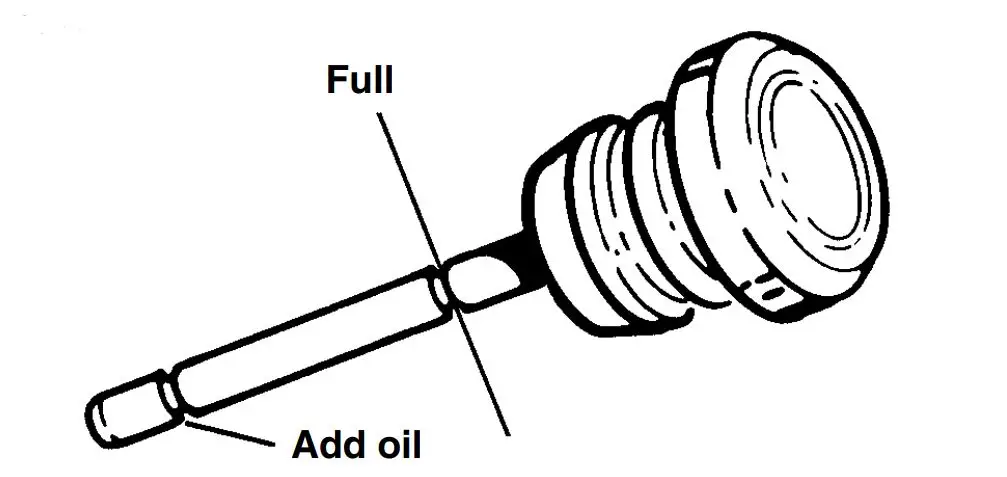
In other bikes, the dipstick only has marks of “add oil” and “full”. For such cases, you must know if you need to check the oil level on the kickstand or Upright. If you are confused about which position to choose, it is a good practice to check your owner’s manual for correct information before checking the oil.
How Do You Check the Oil Level of Harley on Kickstand?
- Park your motorcycle on the jiffy stand. Make sure that the surface is flat.
- Next, check the motorcycle’s oil level via:
- Remove the filler plug/dipstick.
- Wipe the dipstick with a clean cotton rag.
- Insert the dipstick back and tighten it up.
- Remove the filler plug/dipstick.
- Check the level against the marks on the dipstick.
- Add makeup oil if your oil level is below (1). Add only enough oil to reach up to just below ADD QT(1)
- Start the engine and keep it running for two minutes to achieve the right operating temperature while on the jiffy stand.
- Turn the engine off and check again. Add oil to bring the level in between ADD QT (1) and FULL HOT (3). Make sure not to add excess oil.
How Do You Change the Engine Oil and Oil Filter of a Harley?
You need to follow these steps to change the oil and filter.
- Park your bike on a level surface.
- Start the motorcycle to bring it up to the normal operating temperature. Once it has achieved the right operating temperature, turn off the engine.
- Remove the filler plug/dipstick.
- Remove the oil drain plug and O-ring. Let the oil drain completely in the oil pan.
- Inspect the oil drain plug for any metal shavings attached to the magnet.
- Change the oil filter in the meantime. Using an oil filter wrench and hand tools to remove the oil filter.
- Clean oil filter mount flange.
- Install a new oil filter
- Lubricate the oil filter gasket by using some of the clean engine oil.
- Hand-tighten oil filter. Do NOT use an oil filter wrench for installation.
- Install oil drain plug and new O-ring.
- Add an initial volume of engine oil which is up to 3.8 L (4.0 qt).
- Verify final fluid levels.
- Check the oil level.
- Start the engine and check for any oil leaks around the drain plug and oil filter.
Final Thoughts
To keep your Harley Davidson engine healthy, you must change the oil after regular intervals.
When checking the oil level, you can either put your bike on a kickstand or upright, depending on your bike type.
For more engine-oil-related queries, explore our blog today.